I had the occasion to test the new Sonoff rfr3.
This device is the evolution of the Sonoff RF basic.
This device is the evolution of the Sonoff RF basic.


The Sonoff RFR3 act as a relay, you power it with AC and you can pilot the relay with the app provided by Sonoff. But of course this it not my goal here.
Before digging into it. I warn you about the risk of manipulating high voltage devices. You have a risk of electrocution. If you don't have the competencies call an electrician.
Don't put in danger yourself, your entourage or your home.
The first thing to verify was to see if i can flash OpenMQTTGateway on it,
pilot the relay and check the buttons pushes.
Before unmounting the SONOFF you must disconnect it from AC.
As I have already done some flashing by FTDI I decided to reuse this method
(I didn't tried SonOTA).
(I didn't tried SonOTA).
There was no special issue encountered during the flashing process.
You will find hereafter the platformio used for the flashing.

Platformio definition :
[env:sonoff-basic-rfr3]
| |
| platform = ${com.esp8266_platform} | |
| board = esp8285 | |
| lib_deps = | |
| ${com-esp.lib_deps} | |
| ${libraries.rc-switch} | |
| ${libraries.esp8266_mdns} | |
| build_flags = | |
| ${com-esp.build_flags} | |
| '-DZactuatorONOFF="ONOFF"' | |
| '-DZsensorGPIOInput="GPIOInput"' | |
| '-DACTUATOR_ONOFF_PIN=12' | |
| '-DGPIOInput_PIN=0' | |
| '-DRF_RECEIVER_PIN=4' | |
| '-DZgatewayRF="RF"' | |
| '-DGateway_Name="OpenMQTTGateway_SONOFF_BASIC_RFR3"' | |
| board_build.flash_mode = dout |
The relay can be piloted by the following commands :
mosquitto_pub -t home/OpenMQTTGateway_SONOFF_BASIC_RFR3/commands/MQTTtoONOFF -m OFFmosquitto_pub -t home/OpenMQTTGateway_SONOFF_BASIC_RFR3/commands/MQTTtoONOFF -m ON
And when you press the button you will receive the following mqtt state :

We can see that the publication is made with json and with a simple LOW value,
this can be configured in your platformio.ini file.
But this was not the goal of experimenting with the RFR3.
Indeed the interesting thing with this device is the 433mhz RF module on it.
From the photo velow you can see that Sonoff choose a SYN470 as the RF receiver:

I never had the occasion to test this module with OMG, this was the occasion.
If we look at the datasheet we see that the module output its data from D0 pin.
Now we have to find a free pin on the ESP8285...
The following blog article give us a list of exposed and non exposed pins :
After some tests here are the results
- gpio 10 ko
- gpio 9 ko
- gpio 16 ko
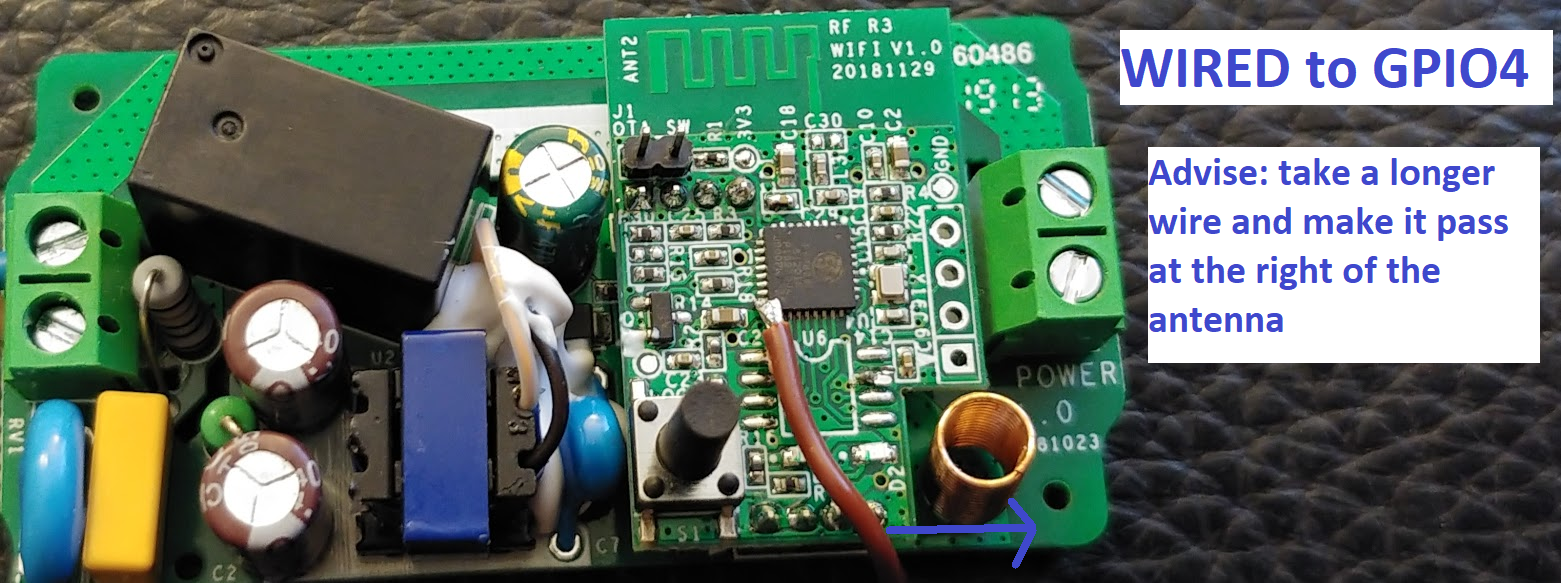
- gpio4 ok Houra!!
Unfortunately GPIO4 is not exposed on the board. We have to solder it directly on the esp8285...
Before that you have to cut the trace coming to the D0 of the SYN470 (see second picture below).
Before that you have to cut the trace coming to the D0 of the SYN470 (see second picture below).
As the GPIO4 is on the ESP edge it can be done wioth some dexterity.
Be carefull on not bending the cable after the soldering this kind of pins are very fragile.

Once soldered we can now use the different RF libraries available
(rcswitch, newremoteswitch or pilight) with OMG and have a 433toMQTT gateway with a relay and a button integrated!
You can now receive signal from your remotes, door sensors, PIR, weather stations...
You can now receive signal from your remotes, door sensors, PIR, weather stations...

Ressources:
Commentaires
Enregistrer un commentaire